Learn AutoCAD with our Free Tutorials
Welcome to CADTutor
CADTutor provides the best free tutorials and articles for AutoCAD, 3ds Max and associated applications along with a friendly community forum. If you need to learn AutoCAD, or you want to be more productive, you're in the right place. See our tip of the day to start learning right now!
Free Tutorials and More…
The Tutorials section provides over 100 original tutorials for AutoCAD, 3ds Max and other design applications. Michael’s Corner is an archive of productivity articles that brings you the best AutoCAD tips and tricks. Our Forum is a lively community where AutoCAD users can ask questions and get answers. The Downloads area provides free AutoCAD blocks, free AutoLISP routines and free images.
Tutorials of the Moment
Recently viewed tutorials
-
Object Selection

This tutorial shows you the many ways AutoCAD objects can be selected. Covers the building of selection sets with implied windowing, fences etc. Format: Text/Image
Last visited: 1 minute ago
-
Animating Materials: Water

Just about everything in the Brycean world can be animated, including materials. This tutorial shows you how to simulate ripples on the surface of a standard Bryce water material by modifying the offset and rotation of the texture component of the material. Format: Text/Image
Last visited: 2 minutes ago
-
AutoCAD 2010: The ViewCube

This tutorial introduces the ViewCube and describes how it can be used for effectively navigating your 3D drawings. Running time: 6min 13sec Format: Video
Last visited: 4 minutes ago
-
Landscape Materials

Efficient landscape modelling demands the ability to create realistic looking surfaces, edges and objects quickly and precisely. This tutorial discusses the issues. Format: Text/Image
Last visited: 5 minutes ago
-
AutoCAD to Photoshop

This tutorial demonstrates a number of workflows from quick and simple to high quality. Format: Text/Image
Last visited: 11 minutes ago
-
ISO Paper Sizes

There has alwas been some confusion over the size of standard ISO drawing sheets with AutoCAD.The stated sizes in the plot dialogue box are not the true ISO sizes. This tutorial explains why and how to plot to scale from Model Space. Format: Text/Image
Last visited: 13 minutes ago
CADTutor Tutorials
Our tutorials are comprehensive but straightforward introductions to AutoCAD and related software. They are designed to help beginners get to grips with design workflows as quickly as possible. There are over 100 to choose from, some text/image based and others in video format. Whatever stage you are at in your learning, you should find a tutorial to help.
Forum Latest
Currently Active Topics
Reload LineTypes in AutoCAD 2027 not working?
by Aftertouch
8 replies
Last post: 30 hours ago
GNSS on AutoCAD
by PGia
26 replies
Last post: 40 hours ago
LAYER PROPERTIES
by ababs
8 replies
Last post: 63 hours ago
Change text color in AutoCAD Lt Tables Lisp request
by MSHR
24 replies
Last post: 70 hours ago
Drafix CAD Pro for Windows 10 and Windows 11
by pcg
3 replies
Last post: 75 hours ago
Python, Clone Layout from another drawing
by Danielm103
0 replies
Last post: 109 hours ago
This Week's Hot Topics
Reload LineTypes in AutoCAD 2027 not working?
by Aftertouch
8 replies
Viewed: 273 times
AutoLISP: Safe alternative to (command "EXPLODE") inside a custom command
by p7q
5 replies
Viewed: 420 times
How to create field that shows text from a dimension
by ColinPearson
0 replies
Viewed: 257 times
Civil design using Bricscad and Civil Site Design.
by BIGAL
0 replies
Viewed: 244 times
Python, Clone Layout from another drawing
by Danielm103
0 replies
Viewed: 214 times
CADTutor Forums
Our forum is a vibrant community of experts and beginners. The main focus is helping beginners get to grips with AutoCAD and to help more advanced users become more productive. The AutoLISP forum is one of the busiest out there, providing expert advice for busy professionals.
AutoCAD Productivity
Drawing Information
From: AutoCAD Productivity Articles #137
Originally published: December 2014
For billing purposes, it's nice to know how long you have spent working in a drawing. To that end, the Time command may be a helpful resource, especially given the elapsed time feature that can be toggled ON and OFF, and can also be Reset.
Command:  TIME
Current time:             Sunday, November 23, 2014  3:44:54:790 PM
Times for this drawing:
  Created:                Wednesday, November 14, 2007  2:42:44:984 PM
  Last updated:           Sunday, November 23, 2014  9:59:28:105 AM
  Total editing time:     0 days 04:45:06:399
  Elapsed timer (off):    0 days 04:44:32:866
  Next automatic save in: 0 days 00:07:30:395

Enter option [Display/ON/OFF/Reset]:
 To keep track of your time in the drawing, launch the Time command, then begin the elapsed timer with the ON option. When finished, use the OFF option to display the total editing time. The above information indicates that I was editing the drawing for a little more than 30 seconds - 04:44:32 to 04:45:06.
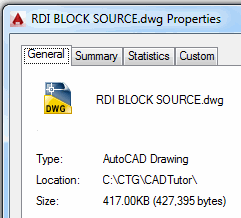
DWGPROPS [] Another useful tool for quick information may be the Dwgprops command found in the ‘scarlet letter’. It's nice to have the Location and Size information immediately available, rather than going out to Save As.
See all the articles published in December 2014
Michael's Corner
Between 2003 and 2016, Michael Beall (and one or two guests) wrote almost 600 articles for CADTutor. The focus of these articles is AutoCAD productivity, and although some of them are now more than a few years old, most remain relevant to current versions of AutoCAD. The article above is just one example. Check out Michael's Corner for a full listing.
Image of the Week
-
29th June to 5th July 2026
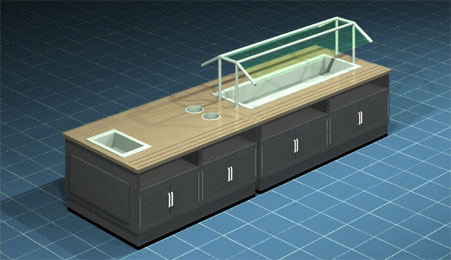
This week's image is by David Bethel
Software used: AutoCAD R12/R13 and Accurender
-
Last Week's Image

Last week's image is by boofrelday
Software used: SketchUp and Podium
-
Two Weeks Ago

This image is by CADken
Software used: SketchUp and Kerkythea
-
Three Weeks Ago

This image is by Jay C
Software used: Revit
Gallery of Work
Over the years, our forum members have contributed hundreds of images, showcasing their amazing work. The images above are just a small selection that demonstrate the wide range of project types our community is involved with. Take a look at our gallery to see all the images published in the last 12 months.
Tip of the Day
Absolute and Relative Coordinates
| Coordinate | Interpretation |
|---|---|
| 25,75 | depends on context |
| @25,75 | relative |
| #25,75 | absolute |
It used to be very simple. Enter a coordinate and AutoCAD interpreted it as an absolute coordinate. Enter a coordinate preceded by "@" (the at sign) and AutoCAD interpreted it as a relative coordinate. This simple rule changed when dynamic input was introduced and now the interpretation of coordinates is contextual. For example, when you draw a rectangle using RECTANG, the coordinate for the second point is interpreted as absolute with dynamic input turned off and as relative with dynamic input turned on. Really, try it and see.
Fortunately, there's a new coordinate prefix that forces an absolute coordinate, even when AutoCAD decides you want a relative one. Precede any coordinate with "#" (the hash sign) to force an absolute coordinate.
Missed a Tip?
Did you miss yesterday's tip? Maybe you forgot to drop by or maybe you don't visit over the weekend. If so, you can now see all the tips published during the past week. Also, if you have a tip you'd like to share with us, you can post it on our forum and if we like it, we'll publish it here.