Learn AutoCAD with our Free Tutorials
Welcome to CADTutor
CADTutor provides the best free tutorials and articles for AutoCAD, 3ds Max and associated applications along with a friendly community forum. If you need to learn AutoCAD, or you want to be more productive, you're in the right place. See our tip of the day to start learning right now!
Free Tutorials and More…
The Tutorials section provides over 100 original tutorials for AutoCAD, 3ds Max and other design applications. Michael’s Corner is an archive of productivity articles that brings you the best AutoCAD tips and tricks. Our Forum is a lively community where AutoCAD users can ask questions and get answers. The Downloads area provides free AutoCAD blocks, free AutoLISP routines and free images.
Tutorials of the Moment
Recently viewed tutorials
-
Site Layout Exercise 2

This exercise is designed to progress your skills in 2D drafting and to test your understanding of layouts and printing to scale from paper space. Format: Text/Image
Last visited: less than one minute ago
-
Advanced Selection

After you've mastered the basics of selection, this tutorial shows you some powerful methods for making complex selection sets. Format: Text/Image
Last visited: 2 minutes ago
-
Drawing Objects

Getting to grips with AutoCAD's basic drawing tools. This is an ideal start for the AutoCAD beginner. Format: Text/Image
Last visited: 3 minutes ago
-
Adding Sunlight to your Drawings

This tutorial takes you through the steps required to add realistic sunlight effects to your 3D model. Format: Text/Image
Last visited: 3 minutes ago
-
Entering Survey Data using AutoCAD

These techniques apply to basic CAD programs such as AutoCAD, IntelliCAD, etc. If you have a civil/survey program or add-on, such as Land Desktop, SurvCADD, Eagle Point, etc., then there are built-in tools for entering lines and curves. Format: Text/Image
Last visited: 4 minutes ago
-
3D Tree Exercise

The object behind this exercise is twofold. Firstly it is to give you practice with some of the 3D techniques which you have discovered in the tutorials or to introduce you to them if you haven't seen them before. Secondly it is to demonstrate a reasonably simple method for constructing a convincing 3D tree. Format: Text/Image
Last visited: 5 minutes ago
CADTutor Tutorials
Our tutorials are comprehensive but straightforward introductions to AutoCAD and related software. They are designed to help beginners get to grips with design workflows as quickly as possible. There are over 100 to choose from, some text/image based and others in video format. Whatever stage you are at in your learning, you should find a tutorial to help.
Forum Latest
Currently Active Topics
Change text color in AutoCAD Lt Tables Lisp request
by MSHR
18 replies
Last post: 9 hours ago
GNSS on AutoCAD
by PGia
20 replies
Last post: 20 hours ago
Copying layouts with vla-CopyObjects breaks drawing
by buntobaggins
7 replies
Last post: 33 hours ago
Block redefinde throught design center and layer colors
by zwonko
5 replies
Last post: 36 hours ago
DIESEL of set/getenv not allowed?
by ScottMC
1 reply
Last post: 44 hours ago
Standard texts are hiding somehow can anyone please help??
by Vijay
0 replies
Last post: 50 hours ago
This Week's Hot Topics
Copying layouts with vla-CopyObjects breaks drawing
by buntobaggins
7 replies
Viewed: 345 times
DIESEL of set/getenv not allowed?
by ScottMC
1 reply
Viewed: 123 times
Standard texts are hiding somehow can anyone please help??
by Vijay
0 replies
Viewed: 86 times
CADTutor Forums
Our forum is a vibrant community of experts and beginners. The main focus is helping beginners get to grips with AutoCAD and to help more advanced users become more productive. The AutoLISP forum is one of the busiest out there, providing expert advice for busy professionals.
AutoCAD Productivity
Text Frame on Mtext
From: AutoCAD Productivity Articles #148
Originally published: October 2016
Yes, you can Enclose Text in Objects from Express Tools — See Michael's Corner, June 2004 — but when using the Text Frame property on Mtext, the frame adjusts when you size the Mtext or change the text content!
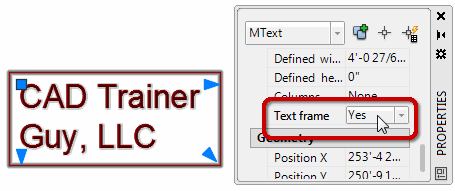
Just select your Mtext, open Properties [Ctrl 1], then set Text Frame to <Yes>.
To test it, change the size of your Mtext or edit the content and the frame automatically adjusts!
See all the articles published in October 2016
Michael's Corner
Between 2003 and 2016, Michael Beall (and one or two guests) wrote almost 600 articles for CADTutor. The focus of these articles is AutoCAD productivity, and although some of them are now more than a few years old, most remain relevant to current versions of AutoCAD. The article above is just one example. Check out Michael's Corner for a full listing.
Image of the Week
-
22nd – 28th June 2026

This week's image is by boofrelday
Software used: SketchUp and Podium
-
Last Week's Image

Last week's image is by CADken
Software used: SketchUp and Kerkythea
-
Two Weeks Ago

This image is by Jay C
Software used: Revit
-
Three Weeks Ago

This image is by khama
Software used: AutoCAD 2006
Gallery of Work
Over the years, our forum members have contributed hundreds of images, showcasing their amazing work. The images above are just a small selection that demonstrate the wide range of project types our community is involved with. Take a look at our gallery to see all the images published in the last 12 months.
Tip of the Day
Oops is your friend
Most AutoCAD users know about the undo command, which allows you to step back through the command sequence. This is useful if you make a mistake and need to retrace your steps. But what if you deleted something a while back and in the meantime you did some useful stuff that you don't want to lose in order to recover your deleted stuff. Oops to the rescue!
The oops command recovers the last deleted selection set, without undoing everything in-between. It can also be used to recover objects removed after using block or wblock.
Missed a Tip?
Did you miss yesterday's tip? Maybe you forgot to drop by or maybe you don't visit over the weekend. If so, you can now see all the tips published during the past week. Also, if you have a tip you'd like to share with us, you can post it on our forum and if we like it, we'll publish it here.