 Michael’s Corner #142
October/November 2015
Minor Adjustments
The last couple versions have brought with them some subtle updates (that I finally discovered!), and then I've had a few things brewing in my ‘Next Michael's Corner’ collection that I'm finally getting around to posting. Next time, I may just splash a bunch of tips out there. For now, however, scroll down to learn more about…
…A2016's update to the Revision Cloud
…Refine the display of non-continuous linetypes
…Adjust the location of the Layout tabs in A2015 & A2016
…Some techniques to ferret out why a drawing may ‘disappear’
The colors are really starting to come out in the Midwest US and the weather's starting to gently turn cooler. Time to enjoy bonfires and S'mores, fireplaces and chili!
Keep up the good work, y'all and I'll chat with you again in a couple months!
If you would like to contact me directly, you can do that also.
Blessings to one and all,
Michael
AutoCAD 2016 Revision Cloud
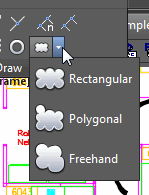 OK, this is actually quite elegant. On the expanded Draw panel of the Home tab, you have a dropdown for the reinvented, new, and improved Revision Cloud: Rectangular, Polygonal, Freehand.
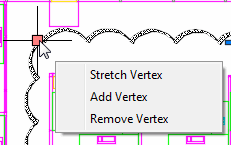
Revision Cloud Insights
Set the Layer, Arc Length, and Style before you start.
Use Freehand for the original Revision Cloud.
The Rectangular version only needs two corners!
Each cloud type has multifunction grips for the endpoints and midpoints. It's fun to just click Stretch and watch it morph!
When creating any version, Polar and Ortho cannot be enabled, but they can when you're editing using grips.
You can edit an existing revision cloud by adding one or more segments.
How to Modify an Existing Revision Cloud
-
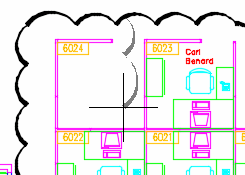 Launch any Revision Cloud, then click Modify.
 The location you click when selecting the ‘polyline to modify’ is where a new cloud segment will begin. There is also a First Point option — similar to the Break command — if you picked a point unwittingly or want to be more precise.
Specify the new points as needed. When you click on another point of the original cloud, you are prompted to pick the side to be deleted.
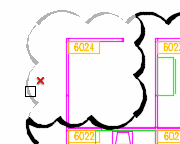
AutoCAD makes an assumption on the direction of the resulting cloud, but you are still prompted to Reverse Direction [Yes No] <No>.
Power Tool
Linetype Tweak
This is totally your call, but you may not even be aware of the option.
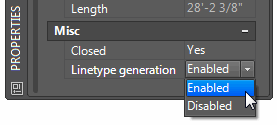


If your non-continuous polylines aren't ‘breaking’ where you would like, select the polyline of interest, open Properties — or use the Ltype gen option of Pedit — then make the necessary adjustment.
The first figure is Enabled, the second figure is set to Disabled. And the good news it, this setting is not 'global' but is object-dependent!
The Odd Spot
Dock Layout Tabs Above Status Bar
As the saying goes, ‘if it ain't broke, don't fix it’.

With the introduction of the updated GUI in A2015, we found ourselves with the layout tabs in line with the Status Bar, resulting in the remainder of the tabs under a ‘feather arrow’ (my term; you can use it).

Thankfully, they fixed it. You can now right-click on one of the Model/Layout tabs, then Dock Above Status Bar.
The Basics
Possible Solutions to the Disappearing Drawing
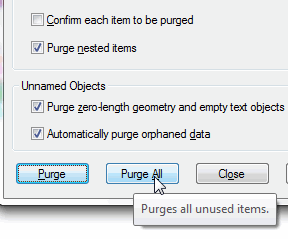 Many of my customers encounter a situation where the drawing disappears when they change the view or use Zoom Extents. Here are a few of my suggestions that I'm beginning to include in all my training sessions:
Purge and Audit a drawing you inherit or haven't worked on in a while. In the Purge command, if the two boxes under Unnamed Objects are ‘live’, check them both.
Save the current layer condition as a layer state, then turn On and Thaw all layers. Objects that are on layers that are Off are still ‘seen’ when you Zoom Extents. Saving the layer state will give a fallback position, just in case.
Set the QTEXT (Quick Text) feature to ON, then Regen the drawing. Turning on Qtext will replace all text objects with boxes and may make the dots around the perimeter of the screen easier to see. This feature was used extensively in the early days of pen plotters when it just took too long — albeit very entertaining over a lunch hour — to plot drawings with a lot of text. Instead of pppllloootttiiinnnggg out each letter, it just drew a quick 4-sided bounding box around the text. (Set QTEXT back to OFF when you're finished.)
Set PDMODE to 35 to display Points in the Circle-X format. All my furniture/facilities customers have drawings with Point objects on the insertion points and other vital locations on their furniture. Setting the PDMODE — Point Display Mode — to 35 makes any floating Point object visible. (Set PDMODE back to 0 to go back to the default condition of dots.)
After all's said and done, hopefully you will see the misbehaving object that's keeping your drawing from displaying as you expected. At that point, you can either move those objects back among their peers… or simply delete 'em. That's your call, but at least now you know what that problem was!
Left Field
I love Southwest Airlines for any number of reasons, but one of them is for their magazine in the ‘seatback pocket in front of you’. On a recent trip, I found it interesting to learn that you're 58% more likely to get a favor if you ask via sticky note. In an experiment conducted at Sam Houston State University, researchers asked test subjects to fill out and return a five-page survey.
The request was either handwritten on the survey's cover sheet, or scrawled on a Post-it and attached to the front. Subjects who received the sticky-note were significantly more likely to complete the survey; they also returned the materials more quickly.
Researchers surmised that the attention-grabbing memos made the inquiry more personal — and thus more palatable. So, how noteworthy is that!
Donate to CADTutor
If you found this article useful, you might like to consider making a donation. All content on this site is provided free of charge and we hope to keep it that way. However, running a site like CADTutor does cost money and you can help to improve the service and to guarantee its future by donating a small amount. We guess that you probably wouldn't miss $5.00 but it would make all the difference to us.
Note from Michael: I want to thank all of my customers for continuing to retain my training services (some for over three decades!) and let you know your donations do not go to me personally, but to the ongoing maintenance of the CADTutor ship as a whole and to support the yeoman efforts of my friend and CADTutor captain, David Watson, to whom I am grateful for this monthly opportunity to share a few AutoCAD insights.
The Basics
- Dual Dimensions in a Dim…
- UCSICON Options
- "Best of" Basics: Irreg…
- Tool Palette Basics
- Original Dimension Value
- Possible Solutions to th…
- Avoid Using 'Standard' i…
- Shorten the Plot Scales…
- Update the Source File B…
- User Increment Angles fo…
- Drawing Information
- 'Sign Language'
- Rotate with the Copy Opt…
- Use the INSERT Osnap on…
- To or From the Current L…


