 Michael’s Corner #9
September 2003
Who needs Rectangles?
Do you ever get tired of rectangular viewports? Seriously, life does not hand us tidy, rectangular drawing environments. This month I thought I'd review a couple old tools that have been around since the release of A2000 but that are under the radar for most users. We'll also take a look at a Trim/Extend treat that may increase your productivity, along with a command "modifier" you may be interested in. Veteran users may pick up a trick in the Basics section, too, as I take a look at some important "recovery methods".
If you would like to contact me directly, you can do that also.
Blessings to one and all,
Michael
Irregular Shaped Viewports

When you need a viewport shape other than a rectangle, the first order of business is to be able to view the objects in Model Space at the desired scale. At that point, you can essentially "crop" the objects in Model Space with a Pline, then turn it into a viewport. If that sounds intriguing, follow these four steps (using the sample drawing db_samp.dwg from the A2000+ sample folder):
- In a layout, create a large viewport (Mview) to see your drawing.

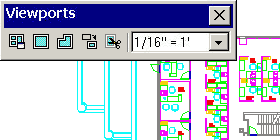
- Toggle into Model Space and set the desired scale:
In the first illustration, I have set the viewport scale to 1/16"=1' for viewing the objects in Model Space. - Return to the Layout and create any closed polyline, spline or circle to be the viewport.
Note: You must use the Close option of the Pline command if it is to be converted into a viewport. If you did not use the Close option, use Pedit and select the polyline, then use the Close option.
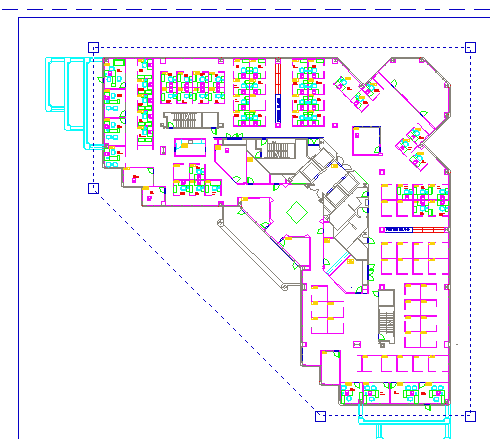
 In the second illustration, I created a triangular shape (shown with grips) to approximate the shape of the building. This will be the resulting viewport shape.
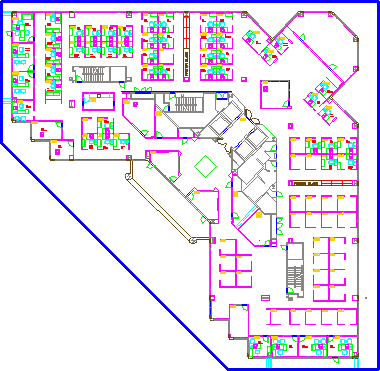
- Use the "Clip Existing Viewport" tool and follow the prompts closely. This will swap the original viewport for the shape you created using Pline.

Power Tool
Many with Multiple
Thankfully, AutoCAD 2002 stays in the Fillet command after you set the Radius. However, as in almost every AutoCAD command, after the command is completed, you're back to the Command line. Yes, you could right-click to invoke the previous command, or hit the spacebar, but have you considered the "Multiple" option for the ongoing use of a command?
Enter MULTIPLE at the command line and you are prompted with "Enter command name to repeat". Enter the command to be repeated and after the successful completion of that command, it starts again. This is great if you're going to be moving several different objects, adding several Mtext objects, erasing numerous groups of objects, applying the same Fillet radius to several corners (set the Radius to 0 to "fix" corners that don't meet), or any number of other procedures where you will be using the same command repeatedly.
The Odd Spot
Easy Edges
When using the Extend or Trim commands, you are prompted to "Select boundary edges" or "Select cutting edges", respectively. When you select the desired edges, they highlight, then you press <Enter> and you are then prompted to select the object to extend or trim. Pretty simple.
Curiously, at the initial prompt to "Select boundary (or) cutting edges" in these commands, if you simply press <Enter> rather than picking those edges, AutoCAD makes all objects an edge. Nothing lights up, it doesn't say "nnn objects selected", zip, nada. AutoCAD just moves on to the next prompt to select the object to extend/trim. At that point you pick the objects you want to extend or trim.
Tip: Make sure the Edge setting is set to No Extend.
The Basics
Do U OOPS or UNDO?
Let's get everybody on the same page with these features, easy one first:
U - This is not the command alias for the Undo command. Type U at the command line and it undoes the result of the last command successfully completed. Even grip edits are undone using U. Keep hitting the spacebar and it will continue to U.
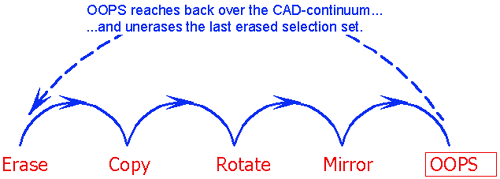
OOPS - This is a great recovery method when you have erased something and then, n commands later, realize you actually needed it! Oops unerases the last erased selection set. As shown, if you erased several objects in one Erase command, you can use Oops immediately or several commands later, but only during that drawing session. You can't save the drawing, re-open and then use Oops.

Note: The only thing that prevents Oops from unerasing is if you have performed, ironically, a U or Undo. Oops will even un-erase if you have performed a Save or Plot in the interim.
UNDO - This one has some power. Type in the whole word at the Command line and you get these options:
[Auto/Control/BEgin/End/Mark/Back]The first two options, Auto and Control, specify if and when the command works. The defaults are fine. BEgin and End group commands together that can be later undone. The last two options are best and work like this:
Mark - Essentially places a "bookmark" in your drawing process that you can return to using the Back option. For example, if you're editing a drawing and you're not sure if it's really going to work out, place a Mark before you begin. This establishes a flag, of sorts, for the Undo command to come Back to.
Back - After spending an hour or so editing, then realize it just isn't what you had hoped, launch the Undo command and enter B for the Back option. AutoCAD goes back (undoes everything) to the point in the drawing at which you placed the Mark. Just like in your Lightolier or Grainger catalog where you have more than one sticky note, you can have more than one Mark in a drawing session. After the first few minutes of your design process, if you want to hold onto what you have so far, use the Undo command and place another Mark. (You can Save during the process, too, without interrupting the integrity of using Back later.) After placing a few marks, when you use the Back option, it will undo your drawing process until it encounters a Mark.
This sound great, but the trick is to remember to place the Marks before you get too deep into your drawing. Which brings us to the overlooked and underused <number> feature of the Undo command:
<1> - The default option of the Undo command enables you to enter the number of commands you want to undo. As AutoCAD veterans, you have a pretty fair idea of how many commands it took to get to where you are from where you want to go back to. (I know you followed that.) So enter a number and AutoCAD undoes that many commands. Just today I had to undo a bunch of things so I started with 12, then 4, then just hit U until I got to where I needed to be.
REDO - Saved the best for last. Actually, it's best in AutoCAD 2004 where they now have multiple Redo!! And they did it right, too. There's even a dropdown list where you see what you're undoing. Ee-hah! Those of you, however, that are running pre-A2004, you get one Redo and it has to follow a U or Undo routine. Unless, of course, you have LT which has had a multiple Redo feature for years!
Donate to CADTutor
If you found this article useful, you might like to consider making a donation. All content on this site is provided free of charge and we hope to keep it that way. However, running a site like CADTutor does cost money and you can help to improve the service and to guarantee its future by donating a small amount. We guess that you probably wouldn't miss $5.00 but it would make all the difference to us.
Note from Michael: I want to thank all of my customers for continuing to retain my training services (some for over three decades!) and let you know your donations do not go to me personally, but to the ongoing maintenance of the CADTutor ship as a whole and to support the yeoman efforts of my friend and CADTutor captain, David Watson, to whom I am grateful for this monthly opportunity to share a few AutoCAD insights.
The Basics
- Dual Dimensions in a Dim…
- UCSICON Options
- "Best of" Basics: Irreg…
- Tool Palette Basics
- Original Dimension Value
- Possible Solutions to th…
- Avoid Using 'Standard' i…
- Shorten the Plot Scales…
- Update the Source File B…
- User Increment Angles fo…
- Drawing Information
- 'Sign Language'
- Rotate with the Copy Opt…
- Use the INSERT Osnap on…
- To or From the Current L…


