 Michael’s Corner #14
February 2004
New Stuff and Old Favorites
This month I've mixed the new with the old. AutoCAD 2004 has some great features in Qnew and the Fillet command that are certainly time savers, and I have been remiss in not pointing out the fundamentals of a template. I also came across an old variable that just might be helpful for those of you working in 3D.
If you would like to contact me directly, you can do that also.
Blessings to one and all,
Michael
Use Qnew for New A2004 Drawings
In an effort to be even more efficient in starting your day, Autodesk introduced Qnew in A2004. It does take a couple steps to get it implemented, however.
You will first need a template file (.dwt) that you want to use each time you begin a new drawing. [See this month's Basics section if you are unfamiliar with templates.]
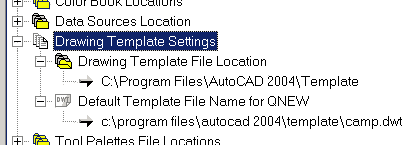
Next, go to the Files tab of the Options dialog and open "Drawing Template Settings". In there you will need to specify the Drawing Template File Location; this may be the (extremely remote) default template folder or click on Browse and choose the folder where you have saved the .dwt file.

Now, click on "None" under the Default Template File Name for QNEW, then click on Browse and navigate to the folder your template is located and select the template file.
 Once these two settings have been established, each time you click the Qnew tool on the A2004 Standard toolbar, AutoCAD will launch a new drawing with the specified template.
Note: just a few helpful tips and gotchas…
- The Qnew template only launches if you use the Qnew tool/command, NOT File/New.
- The Qnew template is also the template you will get when you launch AutoCAD.
- The Qnew template configuration is saved with your profile. Translation: If you use more than one profile, you will need to configure the Qnew settings for each one.
Power Tool
Fast Fillet on Polylines, and a New Multiple Option, too!
It's the little things in life sometimes, isn't it? Most folks use the Fillet command for single fillets here and there, but the Polyline option on this command can make fast work of a shape that requires, let's say, a 0.0625 burr off each of 20 corners of a piece part. After setting the radius for the Fillet, enter P for the Polyline option, then select the pline to apply the fillet to all the corners.
And now in AutoCAD 2004 there's a new option in the Fillet command; mUltiple. This feature now enables you to pick a series of object pairs to fillet without needing to re-launch the Fillet command for each pair.

The Odd Spot
Elevation
Those of you who work in 3D are pretty capable, I'm sure, but I found this old gem as I was investigating some other features. The Elevation variable enables you to enter an elevation or Z-value for new objects. For example, set the Elevation to 29" and any new objects drawn will be at worksurface height. Even blocks will be placed at the specified elevation. The elevation property of an object is![]() editable in the Properties window, too.
editable in the Properties window, too.
Yes, you can move the UCS to the desired location, but by setting the Elevation variable, you can leave the UCS at a more convenient location. Just something to think about. Send me an email if this feature will be helpful in your job.
The Basics
Template Fundamentals
This month's article on AutoCAD 2004's Qnew feature requires that you have a template. So just in case you've never created one, this should help.
The following is a list of things you may want to consider setting up in your template:
Units AutoCAD's default is decimal, so this is your first stop if you're using feet-inches.
Limits You probably need an area bigger than the default 12" x 9" most of the time.
Layers What layers would you like have available as you begin every new AutoCAD drawing?
Linetypes What linetypes would you like to have pre-loaded for each new drawing?
Dimension Style Set 'em up in the template and they’ll be there every time.
Text Style Create as many text styles as you will need in your drawings.
Blocks If you insert a block, then Erase it, the block definition will still be there. [See May, 2003]
Typically, I recommend that you leave out predefined Layouts from the template. A more efficient approach to accessing predefined Layouts would be to use DesignCenter and bring in the desired Layout(s) from a specific .dwg in which you have created several Layout tabs for your various output devices and sheet sizes.
 Creating the .dwt file
Once you have configured the drawing, go to File/Save As and change the Files of type setting to AutoCAD Drawing Template file (*.dwt). AutoCAD automatically jumps to the default \Template folder at which point you can name the file (.dwt).
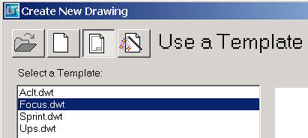
 To test what you did, close the template and those of you with AutoCAD2004, follow the procedures mentioned above in the Qnew review. Those of you with virtually any other version, including LT, when you launch a new drawing, click on the Use a Template button from the Create New Drawing dialog and select your template from the list.
That should save all kinds of time!
Donate to CADTutor
If you found this article useful, you might like to consider making a donation. All content on this site is provided free of charge and we hope to keep it that way. However, running a site like CADTutor does cost money and you can help to improve the service and to guarantee its future by donating a small amount. We guess that you probably wouldn't miss $5.00 but it would make all the difference to us.
Note from Michael: I want to thank all of my customers for continuing to retain my training services (some for over three decades!) and let you know your donations do not go to me personally, but to the ongoing maintenance of the CADTutor ship as a whole and to support the yeoman efforts of my friend and CADTutor captain, David Watson, to whom I am grateful for this monthly opportunity to share a few AutoCAD insights.
The Basics
- Dual Dimensions in a Dim…
- UCSICON Options
- "Best of" Basics: Irreg…
- Tool Palette Basics
- Original Dimension Value
- Possible Solutions to th…
- Avoid Using 'Standard' i…
- Shorten the Plot Scales…
- Update the Source File B…
- User Increment Angles fo…
- Drawing Information
- 'Sign Language'
- Rotate with the Copy Opt…
- Use the INSERT Osnap on…
- To or From the Current L…


