Recession-Proof Productivity Tips
We all have to work smarter these days. For those of you needing to keep your skills sharp as you look for a new position, the Archives have over 400(!) tips and insights that are sure to enhance your "skills portfolio". If you now find yourself doing the work of the folks that were just let go - or have fewer hours to handle the same workload - you may find just what you're looking for this month.
This month we have…
…How to economize the Ribbon in A2009 and A2010. (I think I have mine just where I want it.)
…What you can do to ‘dismantle’ AEC_WALLS in a drawing originally created in AutoCAD Architecture.
…‘Text only’ dimensions (definitely belongs in the ‘Odd Spot’).
…Using Properties to ‘straighten’ skewed blocks and text objects.
Hopefully these tips… afford you some time to tend that garden!
If you would like to contact me directly, you can do that also.
Blessings to one and all,
Michael
Ideas for Personalizing the Ribbon
 Word to the Wise: Workspace
The condition of the Ribbon is stored in the current workspace. I would suggest, therefore, creating a workspace to save how you currently have your drawing environment setup. After creating a ‘status quo’ workspace (what David Watson very wisely referred to as a "fall back strategy" in his coverage of the ribbon last July), save another workspace to be your Ribbon ‘playground’.
For detailed coverage on creating a Workspace, see Michael's Corner, May 2009.

Ribbon Terms
Heidi Hewitt has a wonderfully succinct phrase to define the mechanics of the Ribbon:
"Each tab contains multiple panels, and each panel contains multiple tools."Tabs:AutoCAD 2010 has 8 tabs in the Ribbon, as shown in the above figure. AutoCAD 2009 has 6 tabs: Home, Blocks & References, Annotate, Tools, View, and Output.
Panels: The panels are the large parts of the Ribbon. This figure shows the Text panel for the Annotate tab.
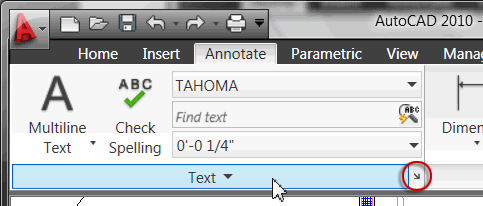
The black triangle beside the tab title [A2010], indicates the panel can be expanded to display more tools. The arrow in the corner typically designates a Style dialog box.
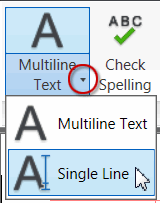 Tools: The Tools are the commands on the panels. If the tool has a black triangle (as shown for the Multiline Text tool on the A2010 Annotate panel), that tool can be expanded to display additional tools.
End of Vocabulary Lesson.
Favorite Feature
 The Minimize arrow. There are three settings to the Minimize arrow: Minimize to Panel Titles (my favorite condition), Minimize to Tabs, and Show Full Ribbon.
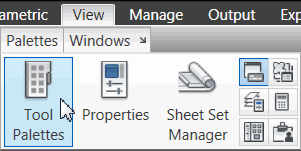 When the Ribbon is minimized to Panel Titles, you have access to the Ribbon panels, but they're not all displayed at once. When you hover over the desired panel group (as shown in the figure for the Palettes panel of the View tab), then the tools are displayed.
Ribbon Management via the Shortcut Menu
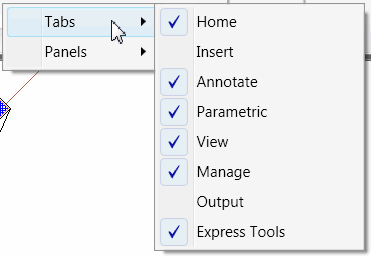 The Plot command can easily be accessed in the Quick Access Toolbar (the panel beside the big red "A"), so let's turn off the "Output" tab of the Ribbon.
Right-click on any element of the Ribbon and you get a shortcut menu with two very important items: Tabs and Panels.
At this point, you've probably made the mental leap on where to go from here, but here's one more insight: The Panels are displayed for the current Tab.
Parting Comment
 Save your Workspace using click the name in the dropdown list.
Power Tool
Dismantling AEC_WALL Objects from AutoCAD Architecture
If you have vanilla AutoCAD and you get a file created using AutoCAD Architecture, you will probably encounter difficulty in editing the walls. Upon further investigation, you may discover the wall objects are called AEC_WALL. You will get ‘unexpected results’ when you go to edit their hatch pattern or wall geometry.
To that end, here are the steps I would use to effectively ‘dismantle’ their unique AEC_WALL identity. It essentially involves a series of Explode commands, but it's important to know what's underneath.
Disclaimer: This review is not intended to rile the passions of those using AutoCAD Architecture and who need the drawing returned in the original condition. The intent is to present a solution to those who need to edit AA drawings that were provided to them, but will not be required to return the drawing to the original source.
Instructions to Dismantle AEC_Walls
Click on the wall in question, then open Properties. You may see that it is a Block Reference inserted on Layer 0.
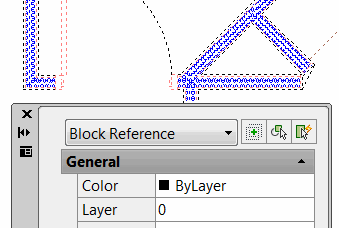
If that's the condition you have, Explode that block reference. If you click on the wall after exploding and you see another block reference (with a different name), Explode that block reference.
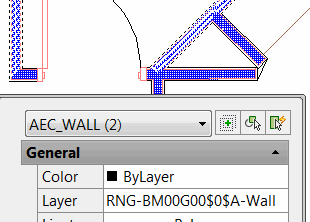
Click on the wall again, open Properties and identify that you now have objects named AEC_WALL. There is a good chance that all the AEC_WALL objects are on a specific layer.
-
 Launch Qselect and set the following conditions, then click OK:
Apply To: Entire Drawing Object Type: Block Reference Properties: Layer Operator: =Equals Value: [the layer shown in the Properties window for the AEC_WALL] With all of the AEC_WALL objects selected, launch the Explode command to explode the selected objects.
 Open Properties and click on one of the walls. There may now be several wall objects; all recognized as a Block Reference, on the same Layer, and all with a unique Name starting with *U.
Launch Qselect again, and set the following conditions, then click OK:
Apply To: Entire Drawing Object Type: Block Reference Properties: Layer Operator: =Equals Value: [the layer shown in the Properties window] 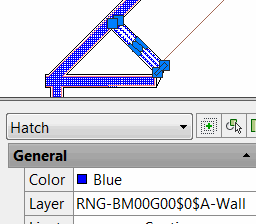
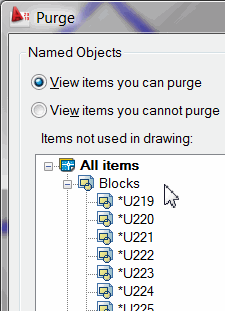 With all the uniquely named Block References selected, launch the Explode command to explode them down to lines, and possibly hatches.
Run the Purge command and you will probably have several Blocks you can purge, nearly all of them with the unique *U prefix.
Note: By way of comparison, an AutoCAD Architecture drawing with AEC_WALLS, when dismantled per the above procedure, went from 6.6Mb to 2.4Mb !!
Update: Within hours of the posting of this month's Corner, I received a very gracious email from Ben Douglas of Robertson & Associates Engineering, Ltd in Calgary, regarding a fabulous routine to expedite the above procedure. If you're dealing with an assortment of AEC_* objects, give the command –EXPORTTOAUTOCAD a try!! (The hyphen must precede the command name.) The integrity of the original drawing is retained and the command creates a new drawing file (you can name it what you want) after dismantling the AEC_* objects. Absolutely fabulous. Thank you, Ben!
The Odd Spot
Text Only Dimensions
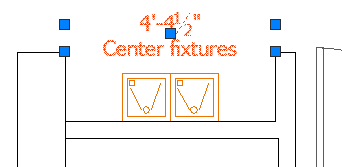 This is totally random, but here's how to create a dimension style with text only.
Instructions to Create a Text Only Dimension Style
Open a drawing with a dimension style you like, then open the Dimension Style dialog box.
Create a New dimension style called "Text Only", then click OK.
On the Lines tab, under Dimension Lines, check the boxes to Suppress Dim Line 1 and Dim Line 2.

Under Extension lines, check the boxes to Suppress Ext Line 1 and Ext Line 2.

Make the desired adjustments to the other dimension elements as desired, then click OK, then click Close.
When you add a dimension, you get the same prompts, but all you will see is the dimension text.
The Basics
Straightening Skewed Annotation and Blocks
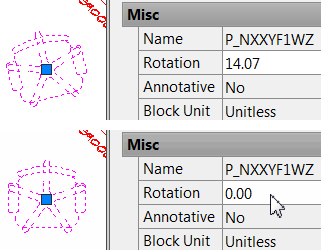 It's not immediately obvious, but the best way to ‘straighten’ an object is to use the Properties window. This usually comes in handy for Text objects, Blocks, Raster Images; things that have a singular Rotation value that can be edited.
A-B-C Solution
Click on the object.
Open the Properties window.
Enter the desired Rotation value.
Left Field
Summer Reading Education: My casual reading fare usually includes Westerns or something in the Good guy/Bad guy genre. I recently learned from a Lee Child novel that Xerox derived their name from the Greek prefix "xero-" meaning dry; hence, copying without wet chemicals!
Donate to CADTutor
If you found this article useful, you might like to consider making a donation. All content on this site is provided free of charge and we hope to keep it that way. However, running a site like CADTutor does cost money and you can help to improve the service and to guarantee its future by donating a small amount. We guess that you probably wouldn't miss $5.00 but it would make all the difference to us.
Note from Michael: I want to thank all of my customers for continuing to retain my training services (some for over three decades!) and let you know your donations do not go to me personally, but to the ongoing maintenance of the CADTutor ship as a whole and to support the yeoman efforts of my friend and CADTutor captain, David Watson, to whom I am grateful for this monthly opportunity to share a few AutoCAD insights.
The Basics
- Dual Dimensions in a Dim…
- UCSICON Options
- "Best of" Basics: Irreg…
- Tool Palette Basics
- Original Dimension Value
- Possible Solutions to th…
- Avoid Using 'Standard' i…
- Shorten the Plot Scales…
- Update the Source File B…
- User Increment Angles fo…
- Drawing Information
- 'Sign Language'
- Rotate with the Copy Opt…
- Use the INSERT Osnap on…
- To or From the Current L…


